ansible-training
Lab 01 - Run Ad-Hoc Commands
Contents
- Objective
- Prerequisites
- Guide
- Step 1: Verify Ansible installation
- Step 2: Run first ad-hoc command
- Step 3: Copy file locally
- Step 4: Create SSH keys
- Step 5: Create inventory file
- Step 6: Run ping command on multiple nodes
- Step 7: Run ping command using nodes group name
- Step 8: Copy file to multiple nodes
- Step 9: Run command on multiple nodes
- Conclusion
Objective
This lab is designed to provide hands-on experience with Ansible, focusing on fundamental tasks such as verifying installation, managing files, creating SSH keys, and executing basic commands on remote nodes.
Prerequisites
- Ansible is installed on the control node
- Python 3 (version 3.5 or later) is installed on the target nodes
- Create a folder named
ansible-labsin your home directory - Create a folder named
lab01insideansible-labs - Navigate to
lab01folder
Guide
Step 1: Verify Ansible installation
Access your control node and verify that Ansible is installed:
ansible --version
You should see output similar to the following:
ansible 2.9.6
  config file = /home/ansible/ansible.cfg
  configured module search path = ['/home/ansible/.ansible/plugins/modules', '/usr/share/ansible/plugins/modules']
  ansible python module location = /home/ansible/.local/lib/python3.6/site-packages/ansible
  executable location = /home/ansible/.local/bin/ansible
  python version = 3.6.9 (default, Apr 18 2020, 01:56:04) [GCC 8.4.0]
Step 2: Run first ad-hoc command
Run the following command to ping localhost:
ansible localhost -m ping
You should see output similar to the following:
localhost | SUCCESS => {
    "changed": false,
    "ping": "pong"
}
This module is used to check if the target machine is reachable. It does not require Python on the remote system, just a reachable network connection and SSH. Because this module does not require Python, it is useful for checking if the remote host is able to be communicated with by Ansible.
Look at command structure:
ansible <host-pattern> -m <module> [options]
host-pattern: The pattern that defines which hosts will be affected by the command. This can be a single host, a group of hosts, or all hosts.module: The module that will be executed on the remote host. This is the action that will be performed on the remote host.options: The options that will be passed to the module. These are module-specific.
Step 3: Copy file locally
First, let’s create a file to copy:
echo "Hello World" > ~/hello.txt
Now run the following command to copy the file to /tmp:
ansible localhost -m ansible.builtin.copy -a "src=~/hello.txt dest=/tmp/"
Step 4: Create SSH keys
For this step check on next image the infrastructure diagram to be used during all the labs:
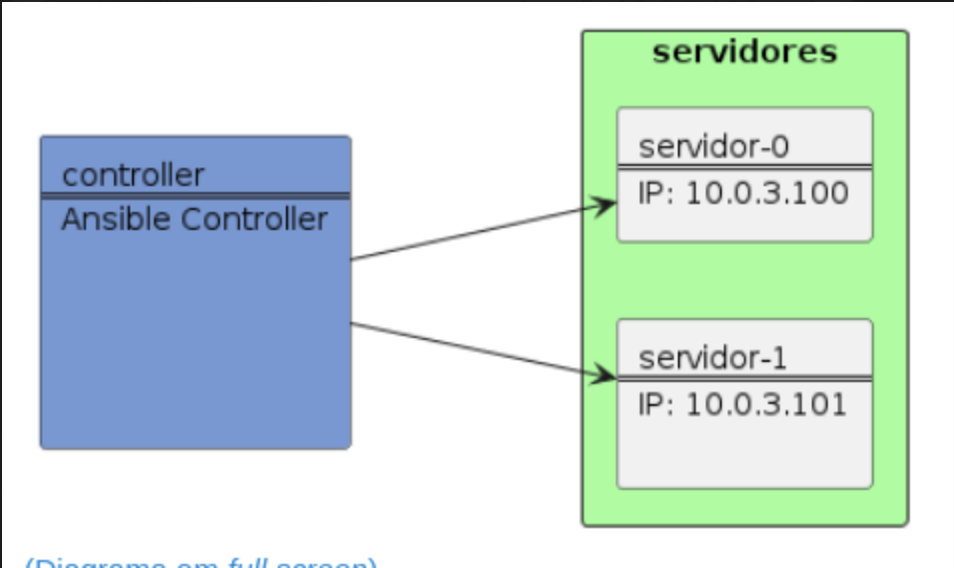
You are running this commands from controler node and your managed nodes are servidor-0 and servidor-1.
To generate new SSH keys, you can use run the following command:
ansible localhost -m ansible.builtin.openssh_keypair -a "path=/home/vagrant/.ssh/ansible"
Now, copy the public key to the remote server servidor-0:
ssh-copy-id -i ~/.ssh/ansible.pub vagrant@servidor-0
You should get a prompt to enter the password for the vagrant user. Enter the password and press Enter.
Repeat this step for the remote server servidor-1:
ssh-copy-id -i ~/.ssh/ansible.pub vagrant@servidor-1
Finally, to reference the key in Ansible, you need to create a file named ansible.cfg in lab01 directory and add the following content:
[defaults]
private_key_file = /home/vagrant/.ssh/ansible
Step 5: Create inventory file
Create a file named inventory.ini in lab01 directory and add the following content:
[nodes]
servidor-0
servidor-1
Step 6: Run ping command on multiple nodes
Run the following command to ping all nodes:
ansible all -i inventory.ini -m ansible.builtin.ping
Since you’re running for 2 nodes, you should see output similar to the following:
servidor-0 | SUCCESS => {
    "changed": false,
    "ping": "pong"
}
servidor-1 | SUCCESS => {
    "changed": false,
    "ping": "pong"
}
To use the inventory file, you need to use the -i option. This option allows you to specify the path to the inventory file. If you don’t specify this option, Ansible will use the default inventory file, which is located at /etc/ansible/hosts.
You can use ansible-inventory command to list all hosts:
ansible-inventory -i inventory.ini --list
To avoid using the -i option every time you run a command, you can add the following content in ansible.cfg file in lab01 directory:
inventory = inventory.ini
Step 7: Run ping command using nodes group name
Run the following command to ping all nodes:
ansible nodes -m ansible.builtin.ping
Since you’re running for 2 nodes, you should see output similar to the following:
servidor-0 | SUCCESS => {
    "changed": false,
    "ping": "pong"
}
servidor-1 | SUCCESS => {
    "changed": false,
    "ping": "pong"
}
On this case, the result is the same as the previous step, since we only have this group. On next labs, we will create more groups and you will see the difference.
But you can also run the following command to ping one node:
ansible nodes -m ansible.builtin.ping -l servidor-0
Step 8: Copy file to multiple nodes
Run the following command to copy the previous created file to /tmp on all nodes:
ansible all -m ansible.builtin.copy -a "src=/tmp/hello.txt dest=/tmp/"
You should see output similar to the following:
servidor-0 | CHANGED => {
    "changed": true,
    "checksum": "e2fc714c4727ee9395f324cd2e7f331f",
    "dest": "/tmp/hello.txt"
    ...
}
servidor-1 | CHANGED => {
    "changed": true,
    "checksum": "e2fc714c4727ee9395f324cd2e7f331f",
    "dest": "/tmp/hello.txt"
    ...
}
Step 9: Run command on multiple nodes
Run the following command to list /tmp folder on all nodes:
ansible all -m ansible.builtin.shell -a "ls /tmp"
You should see output similar to the following:
servidor-0 | CHANGED | rc=0 >>
hello.txt
...
servidor-1 | CHANGED | rc=0 >>
hello.txt
...
Let’s check if the file was copied correctly:
ansible all -m ansible.builtin.shell -a "cat /tmp/hello.txt"
You should see output similar to the following:
servidor-0 | CHANGED | rc=0 >>
Hello World
servidor-1 | CHANGED | rc=0 >>
Hello World
Conclusion
Congratulations! You’ve completed the lab exercise.
These instructions will guide you through basic Ansible operations such as checking installation, copying files, creating and distributing SSH keys, managing inventory, and executing commands on remote nodes.